Contributing to FastVideo#
Thank you for your interest in contributing to FastVideo. We want to make the process as smooth for you as possible and this is a guide to help get you started!
Our community is open to everyone and welcomes any contributions no matter how large or small.
Developer Environment:#
Do make sure you have CUDA 12.4 installed and supported. FastVideo currently only support Linux and CUDA GPUs, but we hope to support other platforms in the future.
We recommend using a fresh Python 3.10 Conda environment to develop FastVideo:
Install Miniconda:
wget https://repo.anaconda.com/miniconda/Miniconda3-latest-Linux-x86_64.sh
bash Miniconda3-latest-Linux-x86_64.sh
source ~/.bashrc
Create and activate a Conda environment for FastVideo:
conda create -n fastvideo python=3.10 -y
conda activate fastvideo
Clone the FastVideo repository and go to the FastVideo directory:
git clone https://github.com/hao-ai-lab/FastVideo.git && cd FastVideo
Now you can install FastVideo and setup git hooks for running linting. By using pre-commit, the linters will run and have to pass before you’ll be able to make a commit.
pip install -e .[dev]

# Can also install flash-attn (optional)
pip install flash-attn==2.7.0.post2 --no-build-isolation

# Linting, formatting and static type checking
pre-commit install --hook-type pre-commit --hook-type commit-msg

# You can manually run pre-commit with
pre-commit run --all-files

# Unit tests
pytest tests/
🐳 Using the FastVideo Docker Image#
If you prefer a containerized development environment or want to avoid managing dependencies manually, you can use our prebuilt Docker image:
Image: ghcr.io/hao-ai-lab/fastvideo/fastvideo-dev:latest
Starting the container#
docker run --gpus all -it ghcr.io/hao-ai-lab/fastvideo/fastvideo-dev:latest
This will:
Start the container with GPU access
Drop you into a shell with the
fastvideo-devConda environment preconfigured
Using the container#
# Conda environment should already be active
# FastVideo package installed in editable mode

# Pull the latest changes from remote
cd /FastVideo
git pull

# Run linters and tests
pre-commit run --all-files
pytest tests/
📦 Developing FastVideo on RunPod#
You can easily use the FastVideo Docker image as a custom container on RunPod for development or experimentation.
Creating a new pod#
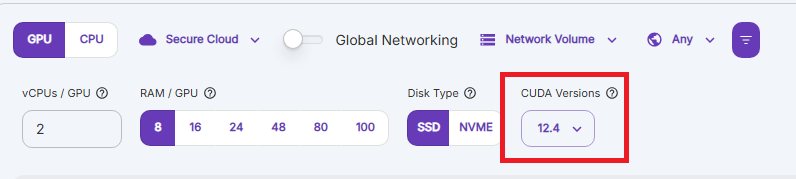
Choose a GPU that supports CUDA 12.4
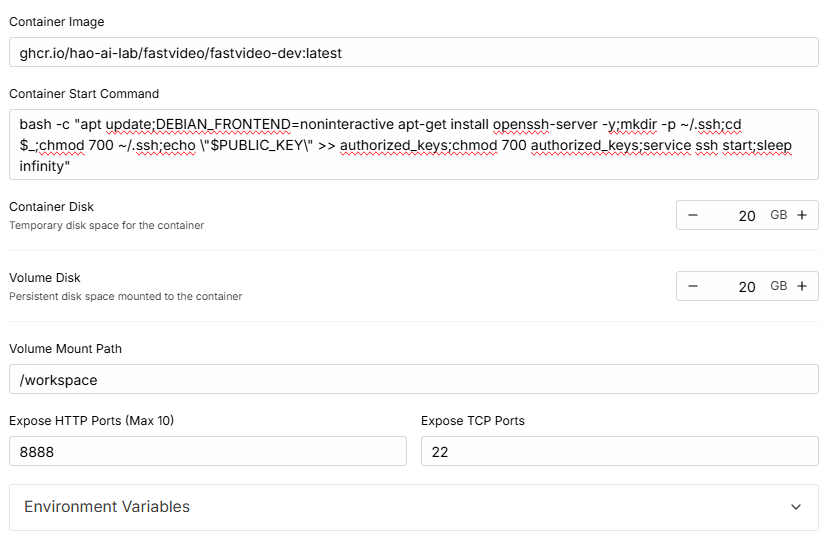
When creating your pod template, use this image:
ghcr.io/hao-ai-lab/fastvideo/fastvideo-dev:latest
Paste Container Start Command to support SSH (RunPod Docs):
bash -c "apt update;DEBIAN_FRONTEND=noninteractive apt-get install openssh-server -y;mkdir -p ~/.ssh;cd $_;chmod 700 ~/.ssh;echo \"$PUBLIC_KEY\" >> authorized_keys;chmod 700 authorized_keys;service ssh start;sleep infinity"
After deploying, the pod will take a few minutes to pull the image and start the SSH service.
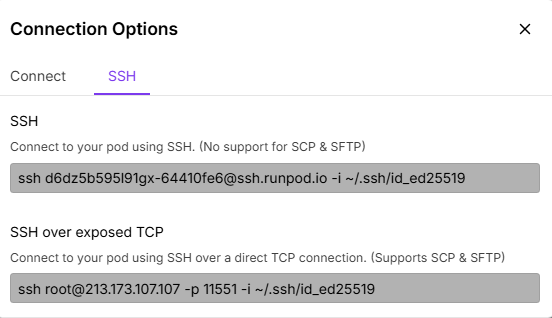
Working with the pod#
After SSH’ing into your pod, you’ll find the fastvideo-dev Conda environment already activated.
To pull in the latest changes from the GitHub repo:
cd /FastVideo
git pull
If you have a persistent volume and want to keep your code changes, you can move /FastVideo to /workspace/FastVideo, or simply clone the repository there.
Run your development workflows as usual:
# Run linters
pre-commit run --all-files

# Run tests
pytest tests/